Putting files into Blogger's root directory
This article explains the issues, and options, for putting a file into the "root directory" of your Blogger blog.
 If you are using certain non-Google products to enhance your Blog, they will sometimes tell you to put a file into your root-directory. They may even tell you to use an FTP tool to do this.
Sometimes this happens when a product also gives you code to install into your blog , This approach is used when the code is written for websites in general rather than specifically to work with Blogger: putting useful files into a place relative to the root directory makes it a lot easier to move a website from a test-address to the live one, so is a common approach outside of Blogger.
Or maybe the other tool has been designed to verify that you do own the website in this way, rather than asking you to change the website code itself.
The long answer is still no: "there is no way to do this, but see the rest of this article for an explanation of why, and some suggested work-arounds."
If you're clever, and have lots of time, you can make a website just using a text-editor (eg notpad), a graphics program, and ftp software that lets you put the files into the right places on computer that's connected to the internet.
Tools like Dreamweaver take away a lot of the time-consuming work, and some of the need for cleverness. But you still need to know a lot about the internet to do things in a way that makes a good website.
Content management systems make this easier still: they let a technically-minded person do the nuts-and-bolts work to make the website, and give authors / artists / editors / content-creators simpler-to-use tools that let them put "stuff" (ie content) into the website, without needing to worry about the details of how it works.
Blogger is a (very simple) website content-management system, it creates our web-pages for us based on data that we put into certain places. Administrators can set up and change the theme, other people, eg authors simply make posts.
When we use Blogger, the main way that we change the data in our web-pages is using the Blogger software.
Some items inside posts or gadgets can be changed using other software, eg Google Docs, provided they were were set up using that other software in the first place. But - key point - there is nothing in the way that Blogger is put together that means we need to access the base directory. So they don't let us do so. And I doubt that this this will change anytime soon.
TIP: blogger's editor sometimes gets links mixed up, so it's important to start the filepath with "http://"
 If someone wants to use a file's position to check that you control a website, then they will have code on their own website that looks for the file in your root directory.
You cannot change this code. And you cannot place the fie.
So you need to ask them for an alternative way to verify, that is suitable for people without root directory access.
If they don't have any alternatives, try lobbying for this on their product support forum: by not having alterantives, they are ensuring that Blogger users, among others, cannot use their service.
If the official answer is still "no", then you could also ask in other on-line forums if anyone has found any other work-arounds.
 I've recently seen someone suggest in a help forum that people with custom domains can put files into their blog's root directory by FTP'ing the files into place.
This may be true, if the service that you are purchasing from your domain registrar includes file-hosting. But file hosting(*)
So it's not a general solution for most Blogger users, though it may work for some.
Initially I was a little sceptical of the idea: Blogger doesn't expect to see any files in our root directory, so I was concerned that it might do strange things if it found them there. But on reflection, I think there is probably a low risk of this happening, since the file-location is outside Blogger's control.
(*) To avoid any confusion, file hosting and DNS hosting are not the same thing. If you buy a custom domain for your blog from a registrar without going through Google/Blogger, then you do need to pay for DNS hosting, but do not need to buy file-hosting.
Picasa-web-albums: a quick introduction
How Blogger data is organised
Setting up a new administrator for your blog
Options for letting other people write in your blog

Sometimes this happens when a product also gives you code to install into your blog , This approach is used when the code is written for websites in general rather than specifically to work with Blogger: putting useful files into a place relative to the root directory makes it a lot easier to move a website from a test-address to the live one, so is a common approach outside of Blogger.
Or maybe the other tool has been designed to verify that you do own the website in this way, rather than asking you to change the website code itself.
How to add a file to your blog's root directory
The short answer for Blogger users is "sorry, you cannot do this".The long answer is still no: "there is no way to do this, but see the rest of this article for an explanation of why, and some suggested work-arounds."
Why not? Every other website tool lets me do this.
 |
| Posts: Blogger's tool for managing the content on our blogs |
Tools like Dreamweaver take away a lot of the time-consuming work, and some of the need for cleverness. But you still need to know a lot about the internet to do things in a way that makes a good website.
Content management systems make this easier still: they let a technically-minded person do the nuts-and-bolts work to make the website, and give authors / artists / editors / content-creators simpler-to-use tools that let them put "stuff" (ie content) into the website, without needing to worry about the details of how it works.
Blogger is a (very simple) website content-management system, it creates our web-pages for us based on data that we put into certain places. Administrators can set up and change the theme, other people, eg authors simply make posts.
When we use Blogger, the main way that we change the data in our web-pages is using the Blogger software.
Some items inside posts or gadgets can be changed using other software, eg Google Docs, provided they were were set up using that other software in the first place. But - key point - there is nothing in the way that Blogger is put together that means we need to access the base directory. So they don't let us do so. And I doubt that this this will change anytime soon.
What to do instead
The options for getting around this restriction depend on how the file that you need to put into your root directory is intended to be used.Installing code
If you have code to install into your blog, and a file to go with it, then you just need to- Host the file somewhere else (maybe in your Picasa-web-album for the blog, if it's a picture)
- Change the code to point to the full path of where you have hosted the file, instead of the relative path used in the code
<div class="separator" style="clear: both; text-align: center;"> <a href="http://www.Blogger-hints-and-tips.blogspot.com" imageanchor="1" style="margin-left: 1em; margin-right: 1em;"> <img border="0" src="//Logo.png" width="100" /></a></div>To change this to use a specific location, I just add a file-path and the file-name of the picture wherever it is hosted.
<div class="separator" style="clear: both; text-align: center;"> <a href="http://www.Blogger-hints-and-tips.blogspot.com" imageanchor="1" style="margin-left: 1em; margin-right: 1em;"> <img border="0" src="https://blogger.googleusercontent.com/img/b/R29vZ2xl/AVvXsEhng9Kt00Eu9iaO2A8fNJrqaCNmOfuvNKwpPrIJqXImJr8vF7F3JH7RV3cSAarwboN2uRbjhUAX6QruXEgmP5gQrUtv-AFhFwhd0Ag62eubfwVPj9Gp_Yg_AIvEKrB4kHfQK5-TZAr3BfNd/s320/Logo.png" width="100" /></a></div>
Verifying ownership
You cannot change this code. And you cannot place the fie.
So you need to ask them for an alternative way to verify, that is suitable for people without root directory access.
If they don't have any alternatives, try lobbying for this on their product support forum: by not having alterantives, they are ensuring that Blogger users, among others, cannot use their service.
If the official answer is still "no", then you could also ask in other on-line forums if anyone has found any other work-arounds.
An afterthought: what isn't recommended
This may be true, if the service that you are purchasing from your domain registrar includes file-hosting. But file hosting(*)
- Isn't necessary for a custom domain used in Blogger (since Google hosts our files for us), and
- Isn't available as part of the services when you buy a custom-domain through Blogger.
So it's not a general solution for most Blogger users, though it may work for some.
Initially I was a little sceptical of the idea: Blogger doesn't expect to see any files in our root directory, so I was concerned that it might do strange things if it found them there. But on reflection, I think there is probably a low risk of this happening, since the file-location is outside Blogger's control.
(*) To avoid any confusion, file hosting and DNS hosting are not the same thing. If you buy a custom domain for your blog from a registrar without going through Google/Blogger, then you do need to pay for DNS hosting, but do not need to buy file-hosting.
Related Articles
File hosts - places to store files used in your blog.Picasa-web-albums: a quick introduction
How Blogger data is organised
Setting up a new administrator for your blog
Options for letting other people write in your blog
The difference between Themes and Templates in Blogger
This article explains the difference between themes and templates in Blogger, Google's blogging tool.
 How a blog that is made with Blogger is shown to a visitor is controlled by four sets of information:
Originally, the first "configuration file" was called a template. In fact, officially it was called a design-template, to distinguish it from the post-template. However because most people aren't aware of the post template, usually just the word "template" is used to mean design-template.
Many of the Wordpress themes have had a lot of graphic design work done on them - using them gives a blog-site which looks very attractive (or otherwise suited for their purpose) on a wide range of screens. Many large websites have been made using Wordpress, and so very many professional designers have created Wordpress themes. Because of this, many people believe that it's easier to get an excellent-looking website from a theme than from a Blogger template.


What types of theme / templates does Blogger have
Editing your blog's template: advantages and disadvantages
How to turn on a mobile theme for your blog
Blogs, Blogger, bloggers, posts pages and screens - understanding Blogger-basics
How to make a real website, using Blogger
What is (was) a Blogger template

- The posts which the blogger writes (ie the content)
- A user-editable "configuration file" which records the overall formatting options which the file designer and then the blogger have chosen
- Another configuration file, called the post-template, which records choices that the blogger has made under Layout > Blog posts (edit), but cannot be edited elsewhere.
- Blogger's own software, which puts the other things together with some internal rules to make "web pages". Bloggers cannot control the rules in this at all.
Originally, the first "configuration file" was called a template. In fact, officially it was called a design-template, to distinguish it from the post-template. However because most people aren't aware of the post template, usually just the word "template" is used to mean design-template.
What is a theme
Other blogging tools (eg Wordpress, Tumblr) called their equivalent file a theme. Most (or even all) of those tools provide less access to change things in the Theme file, for example if you use a Wordpress free-hosted blog, then you cannot change any of the code in your theme, you can only make formatting changes which are allowed for in the Wordpress front-end.Many of the Wordpress themes have had a lot of graphic design work done on them - using them gives a blog-site which looks very attractive (or otherwise suited for their purpose) on a wide range of screens. Many large websites have been made using Wordpress, and so very many professional designers have created Wordpress themes. Because of this, many people believe that it's easier to get an excellent-looking website from a theme than from a Blogger template.
Blogger templates have now become themes
Recently - I noticed it in March 2017 - Blogger started calling their templates "themes".- They've changed the menu option on their dashboard from "Template" to "Theme".
- They've changed the action button names in the template/theme editor to say things like "Save theme".
- They've written various help articles which refer to themes.

What hasn't changed
- We can still edit our
templatesthemes extensively. - The Blogger tools that make the changes in our themes haven't changed: All the items under the Themes tab on the dashboard are the same as the ones on the Templates tab.
- The contents of our existing themes are still much the same (I cannot guarantees they haven't made any changes, but I haven't seen any)
- The themes that we can choose from when making a new blog, or changing the format of an existing one, are the same.
- There are hundreds of help and how-to articles written by blogger-helpers like myself, which all refer to templates. (I've started changing mine - but it's going to take a while!)
What else is going to change?
This is the big question: Is the rename a precursor to some other changes, eg restricting how much control we have over our themes? - or is it just a cosmetic change to make Blogger seem more modern?
Will there be some new themes released - ones that look better across a range of devices, maybe even some that are optimized for mobile instead of desktop use?
Will there be new theme-editing features introduced into Blogger's interface, to let us control things we cannot control now?
Conclusion / TL-DR
Only Google's Blogger product managers know exactly what the future plans for Blogger are - and they're not known for talking about the future direction until they're just about to introduce new features.
But until they do, my conclusion is that there is no difference between templates and themes in Blogger. They are simply two different words for exactly the same thing.
NB: Blogger product a announcements are usually made in the Blogger Buzz blog - and I see that template were still called templates in their most recent post in November 2016:

Related Articles
How to edit your Theme in BloggerWhat types of theme / templates does Blogger have
Editing your blog's template: advantages and disadvantages
How to turn on a mobile theme for your blog
Blogs, Blogger, bloggers, posts pages and screens - understanding Blogger-basics
How to make a real website, using Blogger
How to edit your Theme in Blogger
This article is about how to edit your theme in Blogger.
It supports many other articles on this site, which suggest specific theme changes needed to solve particular problems. Note that until early 2017, themes were called templates. In practise, "edit your template" and "edit your theme" mean the same thing.
 In Blogger, a theme is a file which controls how your blog are displayed on the screen when someone reads it using a browser or a mobile device. Themes used to be called templates, but were renamed "themes" in early 2017.
Previously, I've looked at whether it's a good idea to edit your Blogger theme / template or not. Because themes are the same thing as templates, the same principles apply to editing your theme.
For many people, editing the theme is simply something which they need to do, because it's the only way to do what they want (remove the attribution, show a gadget on the homeppage only, add a Facebook like button to posts, etc). And Blogger is often preferred because it allows users to edit aspects of their theme which other blogging tools done allow changes to.
 I know: It's tempting to skip this if you're only making a small change. I even skip it myself sometimes. And it's not needed if this is the first time you've ever customised your theme - because you can recover from problems by just reinstalling the standard theme.
But if you would be upset to lose any theme changes you made earlier, or if the change you are making now is not minor, then I strongly recommend making a copy before you start, just in case. To do this

Now you have your theme open in the theme editor, the next challenge is making changes successfully - or backing them out if your changes were not successful.
 Some changes can be checked very easily, sometimes from the preview screen.
But if your change isn't visible on the front screen, you must check it after you have applied it. What to verify depends on your them type, what the change was, and what other features (eg the page-gadget as a menu, the archive widget, ) your blog uses. You need to decide what to test, based on all of these.
At least, I always click on and check on these things when I've made a major theme change:
And if I'm being particularly reader-focussed, I'll also check these things in more than one browser: usually in the current version of Internet Explorer, Firefox and Chrome.
There is no right answer to this question: It's a personal decision, based on the blog, and your readers. But if you do need to remove the theme change, here's how to do it:
It is best to restore your theme before you have changed any gadgets. If you get a message about widgets being missing, then it means that the gadgets associated with your blog are not the ones referred to in the theme. If this happens, you need to decide whether to deep or delete any "orphaned" ones, and may need to check their settings again.
Finding things while editing in your blogger theme
Adding CSS formatting rules to your blog, without editng the theme
How to remove the "powered by Blogger" attribution from designer-theme blogs
Putting a gadget on the homeppage only
Planning changes to your blog - without readers seeing what you are doing
It supports many other articles on this site, which suggest specific theme changes needed to solve particular problems. Note that until early 2017, themes were called templates. In practise, "edit your template" and "edit your theme" mean the same thing.

Previously, I've looked at whether it's a good idea to edit your Blogger theme / template or not. Because themes are the same thing as templates, the same principles apply to editing your theme.
For many people, editing the theme is simply something which they need to do, because it's the only way to do what they want (remove the attribution, show a gadget on the homeppage only, add a Facebook like button to posts, etc). And Blogger is often preferred because it allows users to edit aspects of their theme which other blogging tools done allow changes to.
Overview - how to edit your blog-theme
In general, the process to edit your theme is:- Make a back-up copy of the theme, as it is now
- Open the theme-editor
- Make the change
- Check that it works, and if not, go back to the previous theme.
How to make a backup copy of your current theme
But if you would be upset to lose any theme changes you made earlier, or if the change you are making now is not minor, then I strongly recommend making a copy before you start, just in case. To do this
- From the Blogger dashboard, go to the Themes tab
- Click the Backup / Restore button near the top right of the dashboard
- Click the Download Theme button, and then wait while the file downloads.
- After the download has finished, find the place where your computer puts downloaded files.
- Find the file that was just created,
- Rename it to something sensible
(eg MyBlog theme backup before change 31 Jan 2012.xml) - Move the file to somewhere safe: usually somewhere on your computer is fine - or you make like to upload it to somewhere like Google Docs, to be absolutely certain that it won't get lost.

How to open Blogger's theme editor
- From the Blogger Dashboard, to to the Themes tab
- Click Edit HTML
Now you have your theme open in the theme editor, the next challenge is making changes successfully - or backing them out if your changes were not successful.
How to make the change to your theme
- Find the code you need to change:
See Searching for text in Blogger's theme editor if you need help with this.
Note: some of the older "how to" articles say to make sure that the Expand Widgets checkbox off or on. This checkbox has now been removed from Blogger's theme editor. If the instructions you are following says to leave it "off", then you should just be able to follow them as is. However if you are told to turn Expand Widgets off, then you need to find the correct part of the code by searching for the widget-id or section name, and then "unfold" that to see the complete code.
- Make the change (This article doesn't go into the principles of theme design, there are plenty of other articles and websites about that: I'm assuming that you know what you need to do).
- Click the Preview theme button
If Blogger can make sense of the change you made, then view of your blog is shown in the theme-editing area, with what looks like your blog's homepage. It's not a real copy of your blog (the links won't work, the spacing might not be quite the same), but it shows you how the home-page will look with your theme edits. - Do a quick check that the screen looks right - for some changes you even be able to tell if the change has been successful just from this preview screen.
However: If the new window/tab shows an error message like
Your theme could not be parsed as it is not well-formed. Please make sure that all XML elements are closed properly. <br/> XML error message: The element type "div" must be terminated by the matching end-tag "</div>".Error 500
or
Your template could not be parsed as it is not well-formed. Please make sure that all XML elements are closed properly. <br/> XML error message: Element type "b:widget" must be followed by either attribute specifications, ">" or "/>".
then Blogger has not been able to understand the change you made. Sometimes the error message gives a clue about what's wrong, although it can be misleading. Check that you made the change correctly - fix any errors and click Preview again. If it still doesn't work, ask for help from the place that suggested the change you are making
.
- Once you are happy that the preview screen looks OK, click the Save theme button.
How to test your theme change

But if your change isn't visible on the front screen, you must check it after you have applied it. What to verify depends on your them type, what the change was, and what other features (eg the page-gadget as a menu, the archive widget, ) your blog uses. You need to decide what to test, based on all of these.
At least, I always click on and check on these things when I've made a major theme change:
- the home page
- the items in the menu bar
- a label value
- an archive widget entry
- custom-search-engine results
- comments
And if I'm being particularly reader-focussed, I'll also check these things in more than one browser: usually in the current version of Internet Explorer, Firefox and Chrome.
What to do if your theme change wasn't successful
If you find that the theme change has caused problems, then ou have have a choice to make:Can you and your readers live with the problems on your blog for "a while", while you look for other solutions?
Or
Do you need to remove the change right now, so visitors can use your blog as it was while you solve the issues.
There is no right answer to this question: It's a personal decision, based on the blog, and your readers. But if you do need to remove the theme change, here's how to do it:
- Open the Themes tab
- Click the Backup / Restore button near the top right of the dashboard
- Click Choose File and find the file that you downloaded earlier
- Click Upload.
It is best to restore your theme before you have changed any gadgets. If you get a message about widgets being missing, then it means that the gadgets associated with your blog are not the ones referred to in the theme. If this happens, you need to decide whether to deep or delete any "orphaned" ones, and may need to check their settings again.
Making complicated changes
If your theme may need a lot of "surgery" while you figure out how to make a change, then it may be a good idea to build a private test-blog to do the work in, and only copy the contents into your "real" blog theme when you are certain that you've got it correct (or correct-enough).Related Articles
Advantages and disadvantes of editing your Blogger themeFinding things while editing in your blogger theme
Adding CSS formatting rules to your blog, without editng the theme
How to remove the "powered by Blogger" attribution from designer-theme blogs
Putting a gadget on the homeppage only
Planning changes to your blog - without readers seeing what you are doing
How to find things in Blogger's Theme editor
This article explains how to find things (gadgets or text) in the Theme editor in Blogger.
 Very often when you are editing your Theme in Blogger, you need to find particular text.
For example, you might need to find all places where "</head" appears, so you can add something to the very next line. Or you might want to find the code for a particular gadget (aka widget), so that you can put a conditional-formatting statement around it.
There are now two tools you can use to find items in the Theme editor:
More information about using each of these is given below.
Then, inside the Theme editor (see Editing your Blogger Theme for how to get there), just choose the name you are looking for from the drop down list . (Click the arrow beside Jump to Widget to see the items in the list):


Applying conditional formatting to widgets
Finding the widget-id for a gadget in Blogger

For example, you might need to find all places where "</head" appears, so you can add something to the very next line. Or you might want to find the code for a particular gadget (aka widget), so that you can put a conditional-formatting statement around it.
There are now two tools you can use to find items in the Theme editor:
- The Jump to Widget tool if you are looking for a Widget
- The Find bar if you are looking for a text string.
More information about using each of these is given below.
How to use the Jump to Widget tool
First, you need to find out the exact name for the widget / gadget that you need to find the code for. (See Finding a gadget's name for a tip on how to do this).Then, inside the Theme editor (see Editing your Blogger Theme for how to get there), just choose the name you are looking for from the drop down list . (Click the arrow beside Jump to Widget to see the items in the list):

Once you have chosen an item from the list, the template editing window moves to the place where this gadget is listed in the theme code. It usually places it in the 2nd line of the editing window. For example, in the picture below, I chose to jump to the Followers1 gadget.

How to find any text in the Theme editor
Click anywhere inside the Theme-editor window: this is the rectangle which shows the code in your Theme. (It's important to click inside here first, or the next command will work differently)
On your keyboard, press Ctrl/f: to do this, hold down the control (ctrl) key, and press the f key.
A search bar will now show in the top right corner of the theme editing window - like this:

Type the text you want to find into the Search bar and press Enter.
The cursor will move to the first time that the text appears.
To find the next place where the text appears, click into the Search-bar and press Enter again
Repeat as often as you need to find the correct place.
When you are finished with searching, click the X button at the right hand side of the Search-bar to close it.
How to see the details inside a gadget or other piece of code
You can now find any text that you need to find in Blogger's theme editor (previously called the Template editor).
But if you look carefully at the Theme-editing window you will see that there is sometimes a horizontal arrow in the left-hand side of the code, and that the line numbers jump - like this:

This happens because some of the detail is hidden, to make the theme-code easier to work with.
But you can use the arrow (called an expand-arrow) to see it all: Click on it and you will see that it changed to a down arrow, and that the code window now shows some extra lines which were previously hidden.
You won't always need to do this: some template edits just say to find the code for a gadget and to put extra instructions before and after it. But others need you to open up the gadget code and make changes inside.
Job done! You can now find gadget and text items inside your Blogger Theme - so you can continue editing it.
Related Articles
How to edit your Theme in BloggerApplying conditional formatting to widgets
Finding the widget-id for a gadget in Blogger
Showing a PowerPoint file in your blog
This article is about options for showing the contents of a PowerPoint file inside your blog.
 Previously I've described how to load content from MS Word to your blog.
But some people have material in PowerPoint (or other presentation software) files, that they want to show in their blog. So far, I've identified three options for doing this.
These approaches should work on any PowerPoint formatted presentation, no matter what tool it was prepared with - except of course if it was Google Docs in which case you go straight to option 2.
At first, I thought that this was a backward approach. But recently I wrote an article based on a presentation that I gave several years ago. After trying various ways of displaying the presentation and the article, I realised that I was trying to find a way to include all the comments that I made when I used the presentation face-to-face. To do this, I needed to show each slide individually, so I used this option because it gives full control over what commentary goes with each picture.
But you may want to copy-and-paste, either because you don't want the content as images, or because you want other things like presenter notes etc that are not stored in the presentation slides.
To do this, you need to:
An alternative may be to export the presentation as an outline (ie rich-text or RTF format), and then convert it via Google Docs in the same way that you would for a Word document. You would need to test this to check if it brings in the items that are stored outside of the slides.
I haven't tried this one out myself, but in theory at least it should work.
Converting from MS Word to Blogger, via Google Docs
File hosting options - places to keep your files on-line
Tools for applying copyright protection to your blog
Putting embed code from an outside service into your blog
.

But some people have material in PowerPoint (or other presentation software) files, that they want to show in their blog. So far, I've identified three options for doing this.
These approaches should work on any PowerPoint formatted presentation, no matter what tool it was prepared with - except of course if it was Google Docs in which case you go straight to option 2.
Option 1: Each slide as an image
Follow these steps:- In PowerPoint, choose Save-as, and choose an image format (eg .png).
- When the system asks if you want all slides or just the current one, choose All.
- Upload all the image files that were created to your blog - it's your choice whether you put them all in the same post, or one-per-post.
I usually upload them firstly to Picasa web albums or another picture-hosting service, and then just link from my blog to there)
At first, I thought that this was a backward approach. But recently I wrote an article based on a presentation that I gave several years ago. After trying various ways of displaying the presentation and the article, I realised that I was trying to find a way to include all the comments that I made when I used the presentation face-to-face. To do this, I needed to show each slide individually, so I used this option because it gives full control over what commentary goes with each picture.
Option 2: Convert to a Google Docs Presentation
This is described in detail in Using Google Docs's publish-and-embed option - I believe it's better than trying to use Google Web-elements, because it achieves much the same thing, and takes one piece (web-elements) out of the equation.Option 3 Copy and Paste
As with MS Word, copy-and-paste from PowerPoint to Blogger is NOT recommended, because the PowerPoint content can have all sorts of extra HTML codes attached to it, and these can cause negative effects in your blog.But you may want to copy-and-paste, either because you don't want the content as images, or because you want other things like presenter notes etc that are not stored in the presentation slides.
To do this, you need to:
- Copy from PowerPoint,
- Paste into a text-editor (eg Notepad in Microsoft Windows)
- Copy again from the text-editor
- Paste into your blog.
An alternative may be to export the presentation as an outline (ie rich-text or RTF format), and then convert it via Google Docs in the same way that you would for a Word document. You would need to test this to check if it brings in the items that are stored outside of the slides.
Option 4 Use a slideshow host
Another approach would be to set up on account on SlideShare or a similar service that allows you to upload slideshows and gives you code that you can add to your blog in the usual way, which embeds the slideshow in your blog.I haven't tried this one out myself, but in theory at least it should work.
Related Articles
Showing a PowerPoint presentation as a slideshow in your blogConverting from MS Word to Blogger, via Google Docs
File hosting options - places to keep your files on-line
Tools for applying copyright protection to your blog
Putting embed code from an outside service into your blog
.
How to not show any posts on your blog's home page, using Blogger
You can set your blog up so that no posts are shown on the main screen - provided you have used some of the other "home page" approaches to give readers other ways of getting to your content.
 Previously I've explained how to only show one post on the main page of your blog.
But some people who want to give their blog a home page go further than that, and don't show any posts on the main screen at all. (Remember, the main screen is where people who navigate to your blog, rather than to posts within it, go.)
This sounds like a strange thing to do - after all, blogs are about posts.
But actually it's fine, provided you use some other tools to let readers move around the blog. I've made a 150+ page blog this way, and it works very nicely because I have organised the information and used some index-pages (containing lists of bus-routes, suburbs, maps etc) with tables that link to many other posts.
There are at least two ways of doing it.
Take a note of the URL of the Page that you use created.
Go to Settings > Search preferences > Errors and re-directions > Custom re-directs
Click Edit then New re-direct
In the dialog box which opens:
Enter zero (0) into the Show at most field


But there may be cases where the second option is better - and I have recently confirmed that it still works.
Remember that you need to set up some other way to let readers move from your home-page to see your other posts - some of the ways to do this are discussed here.
Giving your blog a home page
Giving readers alternative ways to see the posts in your blog
What are dynamic view themes?
Blogger theme types
.
Using tables in your blog
Displaying a gadget only on the home page

But some people who want to give their blog a home page go further than that, and don't show any posts on the main screen at all. (Remember, the main screen is where people who navigate to your blog, rather than to posts within it, go.)
This sounds like a strange thing to do - after all, blogs are about posts.
But actually it's fine, provided you use some other tools to let readers move around the blog. I've made a 150+ page blog this way, and it works very nicely because I have organised the information and used some index-pages (containing lists of bus-routes, suburbs, maps etc) with tables that link to many other posts.
How to show no (ie zero, 0) posts on the main screen
Some people want to do this, as part of the process of giving their blog a home page. It's not possible if your blog has a Dynamic thene, but can be done for blogs with Layout themes.There are at least two ways of doing it.
Option 1 - use a custom re-direct for your home-page
Make a new Page (Pages > New Page) and add the material which you want to show on your main screen. Publish this page.Take a note of the URL of the Page that you use created.
Go to Settings > Search preferences > Errors and re-directions > Custom re-directs
Click Edit then New re-direct
In the dialog box which opens:
- Enter a back-slash (ie / )into the first (From) box.
- Enter the URL of the page that you noted earlier into the second (To) box
- In the To box, remove the blog-address, because Blogger already adds that for you.
Eg if your URL is http:/www.myBlog.com/p/home.html
then just enter /p/home.html
(note that you keep the backslash (/) just before the P.
Click the Permanent checkbox.
Click Save just under the entry you just made - it now looks like this:
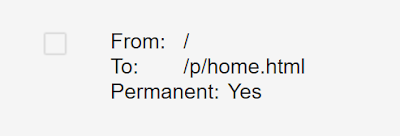

Click Save changes.
Job Done! Anyone who goes to your blog's home page will now go automatically to the alternative page you made - and the effect is that no posts are shown on the home page.
Option 2 - use the Posts and Comments setting
Choose the Settings > Posts and Comments panel from the left sidebar.Enter zero (0) into the Show at most field
Click Save Settings in the top right hand corner of the screen.

About this method
The method in Option 2 works: no posts are shown on your home page.
But by default, nothting else is shown, either. Unless you take steps to avoid it, your readers will see a grey box saying "0 Posts" when they look at your blog's main URL.

Some of the things you can do to avoid this include hiding the "showing posts with label XXX" message, and creating a gadget that only shows on the "home" page.
Recommended option
The custom re-direct option is probably the best approach - and is certainly what I've used for my blogs recently: it's clean, and doesn't need any special messing around with gadgets etc to put content onto the "home" page.
But there may be cases where the second option is better - and I have recently confirmed that it still works.
Whichever option you choose
Remember that you need to set up some other way to let readers move from your home-page to see your other posts - some of the ways to do this are discussed here.Related Articles
Limiting your blog to only have one post on the main pageGiving your blog a home page
Giving readers alternative ways to see the posts in your blog
What are dynamic view themes?
Blogger theme types
.
Using tables in your blog
Displaying a gadget only on the home page
How to get a valid URL for a picture in Google Photos
This article explains the problems with getting valid, SEO-friendly links to images that are in Google Photos - and shows a way of doing this using Google products.
Previously I've explained how to get a URL for a picture stored in Google Photos - and the difference between Photo's "shareable links" and real photo URLs.

1 If you haven't done so already, then upload the photo to Google Photos, in whatever way you usually would (if you have your smartphone synched with your Google account, you may not even notice uploading it).
2 In Google Photos, find the photo and put it into an album.
(It doesn't matter which album you use - and you can delete the album again later, you just need the photo to be in an album for now, and you need to remember which album this is).
3 Using a desktop or laptop computer (ie not your phone), go to Blogger
Or like this, if you didn't give the image a better filename before uploading it:
11 Find the part which starts src=" and ends with a closing quote-mark. This is the URL for the picture you chose. In the example above, it's the part in bold-red
Using marker text to find things in your post's HTML code
Things to consider before starting to use Blogger
Using Blogger's post-editor as an HTML generator
Previously I've explained how to get a URL for a picture stored in Google Photos - and the difference between Photo's "shareable links" and real photo URLs.
The sort of link you get with this procedure looks like this:
There are some issues with using URLs (aka web-addresses) obtained like this:
Luckily, there is a way around these problems, which gives you a web-address for a picture stored in Google Photos that ends with the same file extension which you uploaded to Photos (eg .jpg, .png .bmp), and which includes the keywords which you used in the file name.
https://blogger.googleusercontent.com/img/b/R29vZ2xl/AVvXsEgDNlQTJvuIoKliQeqzXojxtGZJqzTjUQxE0_uOlrOMIohjUFvlldoSDVw44lRIOf1XU5GaOIjMTa_FUsm9sXQX04C4oHeblDykyKjn3cwgpiXOWXTZhJgJWRy54v0YICrAy05hRkwBzvlU/w1006-h566-no/
There are some issues with using URLs (aka web-addresses) obtained like this:
- They aren't recognised as valid image file links by many online tools which ask for the URL for an image (eg phpBB, Blogger - and many others)
- Sometimes they stop working
(I've not been able to track down exactly when, but there are reports around the internet from people who say that links like this work for a while and then stop).
- They don't include the SEO-targeted keywords which you carefully used to name the photograph file before uploading it to Google Photos.
(Not everyone does this, and it's a lot harder for photos that were taken on your phone. But some people do it, and to them not having the keywords in the photo URL is a big deal.)
Luckily, there is a way around these problems, which gives you a web-address for a picture stored in Google Photos that ends with the same file extension which you uploaded to Photos (eg .jpg, .png .bmp), and which includes the keywords which you used in the file name.

How to get a valid URL / web-address for a picture in Google Photos, using Blogger
1 If you haven't done so already, then upload the photo to Google Photos, in whatever way you usually would (if you have your smartphone synched with your Google account, you may not even notice uploading it).
2 In Google Photos, find the photo and put it into an album.
(It doesn't matter which album you use - and you can delete the album again later, you just need the photo to be in an album for now, and you need to remember which album this is).
3 Using a desktop or laptop computer (ie not your phone), go to Blogger
- If you've never used Blogger before, you may be asked to accept the terms and conditions. Just say "yes" to this (you are't actually going to use Blogger to publish anything).
- If you don't already have a blog, the click the Create a blog link, and follow the steps to create one.
(You won't be publishing this blog, so it doesn't really matter what name you give it or what template you use - just pick anything that's available. )
- Or if you do have one or more blogs, just pick one (any one is OK: you're not actually going to publish to it) and go into the Blogger Dashboard.
4 Click New Post
This opens up the post editor.
5 In the tool-bar at the top of the post editor window, click the Insert image icon.


6 Choose the From the Google Album Archive tab.
(Google have changed the name for this a couple of times since they introduced the feature - right now it says exactly what I've listed here - the name may vary, but you get the idea: choose your Google Albums).
7 Navigate to the album that you put the picture into, in step two. Open it, and find the picture, and select it.
(Google have changed the name for this a couple of times since they introduced the feature - right now it says exactly what I've listed here - the name may vary, but you get the idea: choose your Google Albums).
7 Navigate to the album that you put the picture into, in step two. Open it, and find the picture, and select it.
8 Choose Ok.
9 Wait a moment while the image is placed into your blog-post, and automatically resized.
9 Wait a moment while the image is placed into your blog-post, and automatically resized.
10 Click on the Edit HTML tab (currently at the top left side of the post-editor) to go into Edit HTML mode. You will see HTML code like this.
<div class="separator" style="clear: both; text-align: center;">
<a href="https://blogger.googleusercontent.com/img/b/R29vZ2xl/AVvXsEichdqs25OqVEqiFU4RL4i3vC5NH8-8ZBpj-4P3XeXTke8_NK4mY4fewB9GoPHyyRh27AaHdW124OhAw8n0QE48-Ofm2aGEWVKQvIOIQimT2pCdqmaztiSZLXj9aecFdIOj5-MIdazP9vw/s1600/tarmacadam-promenade-sunny-september-day.PNG" imageanchor="1" style="margin-left: 1em; margin-right: 1em;"><img border="0" height="180" src="https://blogger.googleusercontent.com/img/b/R29vZ2xl/AVvXsEichdqs25OqVEqiFU4RL4i3vC5NH8-8ZBpj-4P3XeXTke8_NK4mY4fewB9GoPHyyRh27AaHdW124OhAw8n0QE48-Ofm2aGEWVKQvIOIQimT2pCdqmaztiSZLXj9aecFdIOj5-MIdazP9vw/s320/tarmacadam-promenade-sunny-september-day.PNG" width="320" /></a></div>
<div class="separator" style="clear: both; text-align: center;">
<a href="https://blogger.googleusercontent.com/img/b/R29vZ2xl/AVvXsEgMpXtwbpdjEieXbN2XQwMRDGqCl8PLCgc2XdrQfdJMp3_5NNvGKpPT1VPYVAmCrw5Eca4X6MaQFUAcG8tWFsF_HmxC2pcCvYvAChnKDN5G4U2RCDVVTgumFE-jgACXjcHS5WyFxvKAbjk/s1600/DSC_3573.JPG" imageanchor="1" style="margin-left: 1em; margin-right: 1em;"><img border="0" height="180" src="https://blogger.googleusercontent.com/img/b/R29vZ2xl/AVvXsEgMpXtwbpdjEieXbN2XQwMRDGqCl8PLCgc2XdrQfdJMp3_5NNvGKpPT1VPYVAmCrw5Eca4X6MaQFUAcG8tWFsF_HmxC2pcCvYvAChnKDN5G4U2RCDVVTgumFE-jgACXjcHS5WyFxvKAbjk/s320/disc0137.JPG" width="320" /></a></div>
12 Select and copy the text between the two quote marks after src= ie the equivalent to the piece of code shown in red.
Job done! A general-purpose, valid, well-formed, web-address for the picture you want is now in your computer's memory, and can be pasted into anyplace where you want to use it.
To get out of Blogger, click Close (near the top right of the screen), and agree to leave the page anyway even though it means you will lose your work.
Troubleshooting / Extra for experts
Finding the image code in your post
If there is other material in the post that you are using, then you may want to put some marker text before and after the photo while you are still in Compose mode, to make it easier to find the right part when you are in Edit HTML mode.Getting a valid link to someone else's photo
You may want to find a valid URL for a photo that someone else has shared with you - but of course you cannot add this to one of your own albums. In this case, the solution is to download a copy of the photo which was shared, then upload it to your own Google Photos.Using the blog you've made for other things
Maybe using Blogger like this has given you ideas about other things you can use it for: that's great, Blogger is an excellent tool for publishing material on the internet with a minimum of fuss - while also having enough features to let you do some sophisitcated things. And even just the post editor can be a handy HTML generator at times. You might like to read Getting Started with Blogger, for some tips about how to set up your Google account and very first blog.Other challenges?
Do you have any questions around this approach, and how to solve problems with it? Please a message in the Comments box at the bottom of the page, and I'll see if I can find a solution.Related Articles
How to get an URL for a picture stored in Google Photos - version 1Using marker text to find things in your post's HTML code
Things to consider before starting to use Blogger
Using Blogger's post-editor as an HTML generator
Saving a post if Blogger's Publish button doesn't work
This article is about how you can save a post even if Blogger's Publish button won't let you save your work.
 Imagine you've been working on a Blogger post for several hours. It's finally ready: you've got the wording exactly right, everything is formatted with bold, italics and bullet-points, your pictures and links are all correct, etc.
But then your internet connection stops working. Or you click the Publish button - and get a message like "Post cannot be saved due to HTML errors". You can't work out how fix the problem, and you need to stop working on it now!
This may seem like a disaster - hours of work wasted.
But luckily there's a very easy way to save your work, and tools to help you diagnose problems.
You should then be able to go in to Compose mode, and see the post as it was when you stopped working on it.
At this point, if the HTML is ok and you have fixed the issues with your internet connection, you can Publish your post.
Sometimes Blogger will tell you what the problem with your HTML is, and show where it's happening by putting the "wrong" code into reverse text when you try to Publish it: this makes it easy to see if you scan through the HTML for the post.
However sometimes Blogger doesn't show you where the problem is - I've noticed this more often recently when using IE 9.0 on complex posts. Instead you get an error message like
A low-tech way to find the problem is to paste the code from the saved file into Blogger's Edit HTML window in smaller sections, and Publish to work out if the problem is in the code that you just pasted: if everything in the first section of code can be published, but there is an error message for the next part, then you know what section the error is in.
A major disadvantage of this approach is that you need to publish the post many times, and the first time it will definitely not be "finished". this is OK if you use a pre-publication blog to prepare your posts, but if you don't do that, it can cause your RSS subscribers to form a bad impression of the quality of your posts.
A better option is to use a source-code editor like Notepad++ (free, Windows only) or XMLSpy (30 day free trial, far more complex code editor), which has tools to help you find and fix problems with your code.
What is RSS and why it matters for your blog
Getting the HTML to put a picture into your blog
Putting text and pictures alongside each other

But then your internet connection stops working. Or you click the Publish button - and get a message like "Post cannot be saved due to HTML errors". You can't work out how fix the problem, and you need to stop working on it now!
This may seem like a disaster - hours of work wasted.
But luckily there's a very easy way to save your work, and tools to help you diagnose problems.
Saving your work and recovering it later
How to save the post that you have written
- Switch to HTML mode (this is a tab at the top left corner of the editing window.
- Select all the text in the window (Ctrl / A does this in most browsers)
- Copy it.
- Go to somewhere outside of Blogger that you can save text:
Perhaps a text-editor like Notepad, or a plain-text formatted email message. Even a word processor like MS Word can work, provided you remember to save your file as text. Or you may want to use a source code editor - see the section below about fixing code errors.
- Paste in the contents that you copied earlier.
- Save the file.
- Switch to Compost mode (this is optional - I usually recommend it so that you don't get confused the next time you come back to Blogger and see the "funny codes")
- Exit the Blogger post-editor by closing the window - say "ok" if the system asks if you really want to leave the page without saving.
Recovering your work later on
This is the reverse of what you did to save the work: open the text file, copy the contents, go to Edit HTML mode in Blogger and paste them in.You should then be able to go in to Compose mode, and see the post as it was when you stopped working on it.
At this point, if the HTML is ok and you have fixed the issues with your internet connection, you can Publish your post.
Fixing problems with your HTML
If there are problems with the HTML, then you need to find them, and fix them. Usually, fixing them is easy, once you've found them - but the finding can be hard if you have a large and complicated post.Sometimes Blogger will tell you what the problem with your HTML is, and show where it's happening by putting the "wrong" code into reverse text when you try to Publish it: this makes it easy to see if you scan through the HTML for the post.
However sometimes Blogger doesn't show you where the problem is - I've noticed this more often recently when using IE 9.0 on complex posts. Instead you get an error message like
Your HTML cannot be accepted: Closing tag has no matching opening tag: SPANor whatever the specific problem is, but none of your code is highlighted. This can make it hard to track down and fix the problem.
A low-tech way to find the problem is to paste the code from the saved file into Blogger's Edit HTML window in smaller sections, and Publish to work out if the problem is in the code that you just pasted: if everything in the first section of code can be published, but there is an error message for the next part, then you know what section the error is in.
A major disadvantage of this approach is that you need to publish the post many times, and the first time it will definitely not be "finished". this is OK if you use a pre-publication blog to prepare your posts, but if you don't do that, it can cause your RSS subscribers to form a bad impression of the quality of your posts.
A better option is to use a source-code editor like Notepad++ (free, Windows only) or XMLSpy (30 day free trial, far more complex code editor), which has tools to help you find and fix problems with your code.
Related Articles
Get your posts right before you publish them for all to seeWhat is RSS and why it matters for your blog
Getting the HTML to put a picture into your blog
Putting text and pictures alongside each other
Putting a badge for a Facebook Page into your Blog
This article describes making a Facebook badge to promote your page, and putting it onto your blog.
 This article is about how to make a badge to promote a Facebook Page.
This is an example of the "follow me" approach to linking your blog and the social networks, although for Facebook pages your reader becomes a Fan rather than a Friend.
Many people are confused about when they should use each of the types of "thing" in Facebook, ie
(Facebook chance the place for actions like this from time to time - you may need to look around to find your pages.)
Copy the URL for the Page you want to promote
(One way is to right click on its name, and choose copy-link-location- or whatever phrase your browser uses. Another is to to go the page, and copy the URLfrom your address bar.)
Come back to this article and click here --- Facebook Social Plugins, to reach Facebook's tools.
(I used to have instructions to launch this from Facebook - but I cannot find any link to it from my Pages page any more.)
Choose Page Plugin / Web.
Scroll down the page, and set the options for your badge. The first one is critical - the others optional:

When you are happy with the selections, choose Get Code.

Copy the code provided
Install the code into your blog - there several options for installing the HTML, depending on where you want to put the badge or button.
Job Done! Your blog will now display a gadget that promotes the selected Facebook page - people can view and like your Page from within your blog.
 People who visit your blog through a web-browser will see a Facebook area, including a Like button and whatever other options you have chosen.
This can be quite a powerful tool: you can easily use two or three different combinations on different parts of your blog: one that has no border, no faces and no header but does show a Stream can effectively look like a "live" feed from your Facebook page to your blog, while another one with different options can show off the size of your fan-base.
Be aware that the Like button shown in this button gives people the option to Like your Page in facebook - not your blog directly, and not the current post that they are reading. If you want them to be able to Like your blog or blog-posts, you need to provide this option separately (and many of your visitors are likely to be confused by the different).
As always, people who read your blog via a feed reader (Bloglines, Google Reader, etc), or by email subscription (eg having used follow-by-email) may not see the Facebook item, depending on where is places and what options their email program has.
fyi, I could have just quoted this code, and said to use it on your blog. But I don't usually do this when I'm describing how to link Blogger and any third party product, because it's likely that Facebook (or whoever) will change their code in the future: it's always safest to get the most up-to-date copy of the code from the source-site when you need it.
The facebook page where you get the code from also has more information about controls you can set in the code, too. Check it out for more information.
At one stage, the first step in these instructions was to
But that's no longer necessary. You can promote any Facebook page that you want to, on your blog.
But be aware that if you show the page-feed on your blog, and you don't own the page, then you have no control over what is shown. It's possible that a feed from someone else's Page will show material which breaks Blogger's terms and conditions - or which you simply don't want on your blog. For this reason along, I'd recommend only promoting your own, or closely trusted, pages on your blog.
How the data in Blogger blogs is organised
Linking Blogs and Websites
Tools for linking Blogger and the Social Networking sites
Putting a Facebook "share this" button on your blog
Copyright, Blogs and Bloggers
Why RSS / Subscribe to Posts is important for bloggers
What is a Facebook page

This is an example of the "follow me" approach to linking your blog and the social networks, although for Facebook pages your reader becomes a Fan rather than a Friend.
Many people are confused about when they should use each of the types of "thing" in Facebook, ie
- Profiles - accounts for flesh-and-blood, living, breathing, individual people
- Pages - for websites, brands, and organisations that don't want to approve all their Facebook members
- Groups - for organisations that want to approve individual members who join (and in return, group-owners can send private messages to individual members.
How to make a badge to promote a Facebook Page
View all your Pages using the arrow drop-down at the very top right of Facebook's toobar.(Facebook chance the place for actions like this from time to time - you may need to look around to find your pages.)
Copy the URL for the Page you want to promote
(One way is to right click on its name, and choose copy-link-location- or whatever phrase your browser uses. Another is to to go the page, and copy the URLfrom your address bar.)
Come back to this article and click here --- Facebook Social Plugins, to reach Facebook's tools.
(I used to have instructions to launch this from Facebook - but I cannot find any link to it from my Pages page any more.)
Choose Page Plugin / Web.
Scroll down the page, and set the options for your badge. The first one is critical - the others optional:
- Facebook Page URL - this needs to be changed to the URL of your page (which you copied earlier)
If you have less than 25 Fans already, then your page's URL will be something like http://www.facebook.com/pages/Blogger-Hints-and-Tips/144194435594821 and you can get it by copying the link from the list of Pages for your account.
Once you have more than 25 fans, you can choose a page-url on the Edit Info > Username screen.
- Tab - the tab on your page that is shown
- Width - choose a value that suits the space on your template where you want to put the box.
- Show faces, show header: choose options that suit your purpose and blog template
- Show stream: this controls whether you show posting from the Page inside your blog

When you are happy with the selections, choose Get Code.
- Currently, there are options for an iframe or Javascript SDK: I recommend using the iframe, unless you are comfortable with the two-part installation needed for the Javascripit, and you are sure that the visitors you want to target will have Javascripti enabled.

Copy the code provided
Install the code into your blog - there several options for installing the HTML, depending on where you want to put the badge or button.
Job Done! Your blog will now display a gadget that promotes the selected Facebook page - people can view and like your Page from within your blog.
What your visitors will see
This can be quite a powerful tool: you can easily use two or three different combinations on different parts of your blog: one that has no border, no faces and no header but does show a Stream can effectively look like a "live" feed from your Facebook page to your blog, while another one with different options can show off the size of your fan-base.
Be aware that the Like button shown in this button gives people the option to Like your Page in facebook - not your blog directly, and not the current post that they are reading. If you want them to be able to Like your blog or blog-posts, you need to provide this option separately (and many of your visitors are likely to be confused by the different).
As always, people who read your blog via a feed reader (Bloglines, Google Reader, etc), or by email subscription (eg having used follow-by-email) may not see the Facebook item, depending on where is places and what options their email program has.
Customizing the code
You can change the characteristics of the box without having to generate the code from Facebook again. For example you can later the width and/or height - just remember to do it in both of the places required if you are using the iframe option:<iframe src="http://www.facebook.com/plugins/likebox.php?href=http%3A%2F%2Fwww.facebook.com%2Fpages%2FBlogger-Hints-and-Tips%2F144194435594821&width=160&colorscheme=light&show_faces=false&border_color=purple&stream=true&header=false&height=395" scrolling="no" frameborder="0" style="border:none; overflow:hidden; width:160px; height:395px;" allowTransparency="true"></iframe>
fyi, I could have just quoted this code, and said to use it on your blog. But I don't usually do this when I'm describing how to link Blogger and any third party product, because it's likely that Facebook (or whoever) will change their code in the future: it's always safest to get the most up-to-date copy of the code from the source-site when you need it.
The facebook page where you get the code from also has more information about controls you can set in the code, too. Check it out for more information.
Do you need to own the page you want to promote?
No - not any more.At one stage, the first step in these instructions was to
"Log into Facebook with a profile (ie personal account) that has administrator rights for the page you want to promote."
But that's no longer necessary. You can promote any Facebook page that you want to, on your blog.
But be aware that if you show the page-feed on your blog, and you don't own the page, then you have no control over what is shown. It's possible that a feed from someone else's Page will show material which breaks Blogger's terms and conditions - or which you simply don't want on your blog. For this reason along, I'd recommend only promoting your own, or closely trusted, pages on your blog.
Related Articles
Putting HTML from a third-party into your blogHow the data in Blogger blogs is organised
Linking Blogs and Websites
Tools for linking Blogger and the Social Networking sites
Putting a Facebook "share this" button on your blog
Copyright, Blogs and Bloggers
Why RSS / Subscribe to Posts is important for bloggers
How to rename picture files in Picasa-desktop
This article is about re-naming files from within Picasa-desktop, to provide SEO benefits for your blog.
 Picasa's desktop software is a good tool for organizing and editing photos on your local computer. And it is still available for you to use on your computer, even though Picasa-web-albums has been replaced by Google Albums + Google Album Archive.
For pictures that are important in your blog, I still recommend preparing them in a tool like Picasa-desktop and then uploading the finished versions to Google Photos before putting them into a post, because:
Picasa-desktop folders have a very nice relationship with files and directories with the Windows file system:
And this means that you can set various properties (eg file name) from either inside Picasa or from Windows.
Unfortunately captions and tags aren't shown when you put a photo in your blog.
This means that the captions and tags are possibly not used by Google in understanding what the photo is about: I've never heard any SEO experts recommending that the IPTC/XMP fields should be keyword optimized. For some bloggers this won't be an issue - but it is if SEO is important for you blog.
Another approach is to put the keyword(s) into the file-name, because file-name is one of the factors that Google looks at when it is indexing images. And this has a nice spin-off for you as well - it means that they keywords are available to any file-search tools that you use on your computer, not just to specialised ones that work with images.
For a long time, I believed that to change the name of a file, I had to go out to my Windows files (using Windows Explorer or similar, and rename them there) - and then wait for Picasa to catch up with the change that I'd made in the file system. But one day I accidentally hit the F2 key, and found that it opens up a very useful dialog box indeed.

Press the F2 key. This opens a Rename Files window.
Type in a new name for the file, for example concrete-pig-outside-butcher-shop-in-ireland
Click the option buttons if you want to include today's date or the file-resolution in the name (I don't usually do this, because I organise my photos into folders according to the date they were taken)

Click Rename to save the change
Job done! The file has a new name in your computer's file system, and is still loaded in your Picasa database.
One option is to download the photo, rename the file on your desktop, and re-upload it. But if you change the name in this way, you also need to change the link to the file in every place that it has already been used. That said, if you only use your photos in one place each, then making a new copy with a different name, uploading it and changing all the existing links can be a good way to deal with copyright theives who have hot-linked directly to your photos.
Today, I'm not sure if it matters so much. In most cases, it's probably more important to use rich, descriptive key words that describe all the aspects of the photo, than to worry about how they're laid out. But I do tend to follow the advice anyway - just in case.
Does SEO matter for your blog?
How to put a picture into your blog.
Understanding Picasa-desktop vs Picasa-web-albums
Taking action when someone has copied your blog without permission
For pictures that are important in your blog, I still recommend preparing them in a tool like Picasa-desktop and then uploading the finished versions to Google Photos before putting them into a post, because:
- The desktop tool has better editing tools (cropping, zooming, auto adjustment, adding watermarks) and Picasa-web-albums does.
- It lets you control the size of the uploaded file
- It's easier to ensure sure that you still have full-size files on my local machine for printing etc, as well as smaller, more optimized, copies to use on web-pages.
Picasa-desktop folders have a very nice relationship with files and directories with the Windows file system:
Each Picasa folder = one directory on your computer
Each Picasa photo = one file on your computer.
And this means that you can set various properties (eg file name) from either inside Picasa or from Windows.
How to associate keywords with photos in Picasa-desktop
Picasa-desktop has two tools for adding keywords to photographs:- You can enter a caption for each photo. This is basically some text, which is stored "inside" the photo, in a hidden-field that is only visible when you are using a software tool that displays the captions. (In technical terms, the caption is stored inside the IPTC/XMP Description field inside the JPEG etc file that you have.)
- You can enter one or more tags for each photo - again, text (individual words or phrases) that is stored in the IPTC/XMP Keyword field.
Unfortunately captions and tags aren't shown when you put a photo in your blog.
This means that the captions and tags are possibly not used by Google in understanding what the photo is about: I've never heard any SEO experts recommending that the IPTC/XMP fields should be keyword optimized. For some bloggers this won't be an issue - but it is if SEO is important for you blog.
Another approach is to put the keyword(s) into the file-name, because file-name is one of the factors that Google looks at when it is indexing images. And this has a nice spin-off for you as well - it means that they keywords are available to any file-search tools that you use on your computer, not just to specialised ones that work with images.
For a long time, I believed that to change the name of a file, I had to go out to my Windows files (using Windows Explorer or similar, and rename them there) - and then wait for Picasa to catch up with the change that I'd made in the file system. But one day I accidentally hit the F2 key, and found that it opens up a very useful dialog box indeed.
How to Change the name of a file in Picasa desktop
Navigate to the picture that you want to change the file-name for, using the Picasa-desktop software.Press the F2 key. This opens a Rename Files window.
Type in a new name for the file, for example concrete-pig-outside-butcher-shop-in-ireland
Click the option buttons if you want to include today's date or the file-resolution in the name (I don't usually do this, because I organise my photos into folders according to the date they were taken)
Click Rename to save the change
Job done! The file has a new name in your computer's file system, and is still loaded in your Picasa database.
How to change the name of a file in Google Album Archive or Google Photos
Currently there is no way to change the name of a file after it is uploaded it to either Google Album Archive or Google Photos: .One option is to download the photo, rename the file on your desktop, and re-upload it. But if you change the name in this way, you also need to change the link to the file in every place that it has already been used. That said, if you only use your photos in one place each, then making a new copy with a different name, uploading it and changing all the existing links can be a good way to deal with copyright theives who have hot-linked directly to your photos.
How to choose "good" names for your picture files
Early SEO advice was to use:- Lowercase letters only (some computers don't like uppercase)
- Only hyphens between words (not spaces, underscores, etc)
- Regular characters only (no á é etc)
Today, I'm not sure if it matters so much. In most cases, it's probably more important to use rich, descriptive key words that describe all the aspects of the photo, than to worry about how they're laid out. But I do tend to follow the advice anyway - just in case.
Related Articles
How to show your photos in a slideshow from PicasaDoes SEO matter for your blog?
How to put a picture into your blog.
Understanding Picasa-desktop vs Picasa-web-albums
Taking action when someone has copied your blog without permission
How to center gadgets in Blogger
Article
,
Blog layout
,
Blogger
,
CSS
,
Gadgets
,
HTML
No comments
:
This article is about centering gadgets from 3rd parties that you install onto your blog.
 Previously, I've described how to put HTML code from a 3rd party into your blog.
When code like this is put into a gadget, one common question is "how do I center it?"
There are (at least) three options for doing this, ie for putting a gadget into the middle (horizontally) of the area it is located in. These are described below.
This will centre the contents and title of every gadget on your blog.
This will centre-align the contents (not title) of the specific gadget that you add.
Note the American spelling of the word "center" - and don't forget to put the closing </div> statement at the end.
There may be some gadgets where it would be possible to add the centring statement to the gadget code itself, rather than putting it outside. I don't recommend this (unless you're so comfortable with HTML and CSS that you don't need to be reading this article), because it introduces a risk that you will interfere with some other aspect, or that you will lose the centering if you ever need to refresh the code.
This approach will only centre the gadget contents - not any header that you give to it.
There are lots of options that you could put into the new style rule, but at a minimum it needs to have
Also, it's best not to use a number as the style-name (eg "2nd-gadgetStyle"), because this doesn't work with some browsers.
Adding a new CSS style into your template
Centering the header in your blog
Putting a gadget above your blog's header
Removing the attribution gadget from Designer-template blogs

When code like this is put into a gadget, one common question is "how do I center it?"
There are (at least) three options for doing this, ie for putting a gadget into the middle (horizontally) of the area it is located in. These are described below.
Option 1: Centre all the gadgets in your blog
To center-align every single gadget in your blog, just, add a CSS rule to your blog. The rule to add is:.widget {
text-align: center;
}
This will centre the contents and title of every gadget on your blog.
Option 2: Only center-align the specific gadget
To only centre-align one gadget, which is made from HTML/Javascript code, you can just put the gadget-code from the 3rd party (eg PayPal, Amazon, etc) inside a centering statement, like this:<div style="text-align: center;">Install the code into your blog the way you would usually install this 3rd party code.
PUT THE CODE FROM THE 3RD PARTY HERE
</div>
This will centre-align the contents (not title) of the specific gadget that you add.
Note the American spelling of the word "center" - and don't forget to put the closing </div> statement at the end.
There may be some gadgets where it would be possible to add the centring statement to the gadget code itself, rather than putting it outside. I don't recommend this (unless you're so comfortable with HTML and CSS that you don't need to be reading this article), because it introduces a risk that you will interfere with some other aspect, or that you will lose the centering if you ever need to refresh the code.
Option 3 - Make a new style rule just for the gadget
If you only want to centre one (or several) gadgets - not all of them - then it's best to define a new style that is to be used on specific gadgets: put this new style into your template, and then apply it to the gadgets like this.<div class="YourNewSytle">PUT THE CODE FROM THE 3RD PARTY HERE</div>
This approach will only centre the gadget contents - not any header that you give to it.
There are lots of options that you could put into the new style rule, but at a minimum it needs to have
.YourNewStyleNotice that there is a "." (ie a full-stop) before the name of your new style.
{
text-align: center;
}
Also, it's best not to use a number as the style-name (eg "2nd-gadgetStyle"), because this doesn't work with some browsers.
Related Articles
Putting HTML code from a 3rd party into your blogAdding a new CSS style into your template
Centering the header in your blog
Putting a gadget above your blog's header
Removing the attribution gadget from Designer-template blogs
Subscribe to:
Posts
(
Atom
)


